Wednesday 28 October 2015

Hairstyles - Rope-braided length shortening buns

In today's post, I'll be showing two length-shortening buns (I also call them half-updos). These are great if you want to put up your hair but still show some length, or if you want to experiment with shorter lengths for a change :)

1. Rope-braided length-shortening bun

I wear this one fairly often. It involves rope-braiding and parandas.

  • For this style, I used:
-An elastic without metal for the initial ponytail.
-A paranda (info about making parandas and braiding them into hair here). The paranda is optional, but a nice addition if you want added volume, hold and colour.
-A stick, flexi-8 or clip.
-Optional claw-clips and/or open bun pins for added hold.
  • Steps:
Video tutorial:

1. Pull your hair into a high ponytail and secure it with a hair-friendly elastic without metal. I find this style works best on medium to high ponytails, but of course, that depends on your personal likings.
2. Divide your hair into two parts. We're going to rope braid it adding a paranda.

The rope braid is, in my opinion, one of the simplest braids alongside the three-strand braid. Here is a tutorial. When you add a paranda, the method is similar (see video tutorial above): First of all, instead of three sections you want the paranda to have two, given that this braid only has two sections. I do this by dividing the middle strand of the paranda equally between the left and right one. Then you add one section to each section of hair and twist the two combined hair+paranda strands to form a rope braid in the usual fashion. Be extra careful not to let the paranda slide down when you start twisting!

3. Now you have a rope-braided high ponytail, to form the length-shortening bun you start coiling the length around the ponytail base, leaving some of the length hanging down. With my knee-length hair, I usually coil the braided length twice (which gives me a waist+ shortened length). The number of times you wrap the length around the base will depend on your initial length, and on how long you want the shortened braid to be.

4. Secure the part that's up in a bun with a clip, flexi-8 or hairstick. I usually add a couple spin pins, small claw-clips or some open bun pins in order to add a bit more hold to the finished style so that it stays put for the whole day.


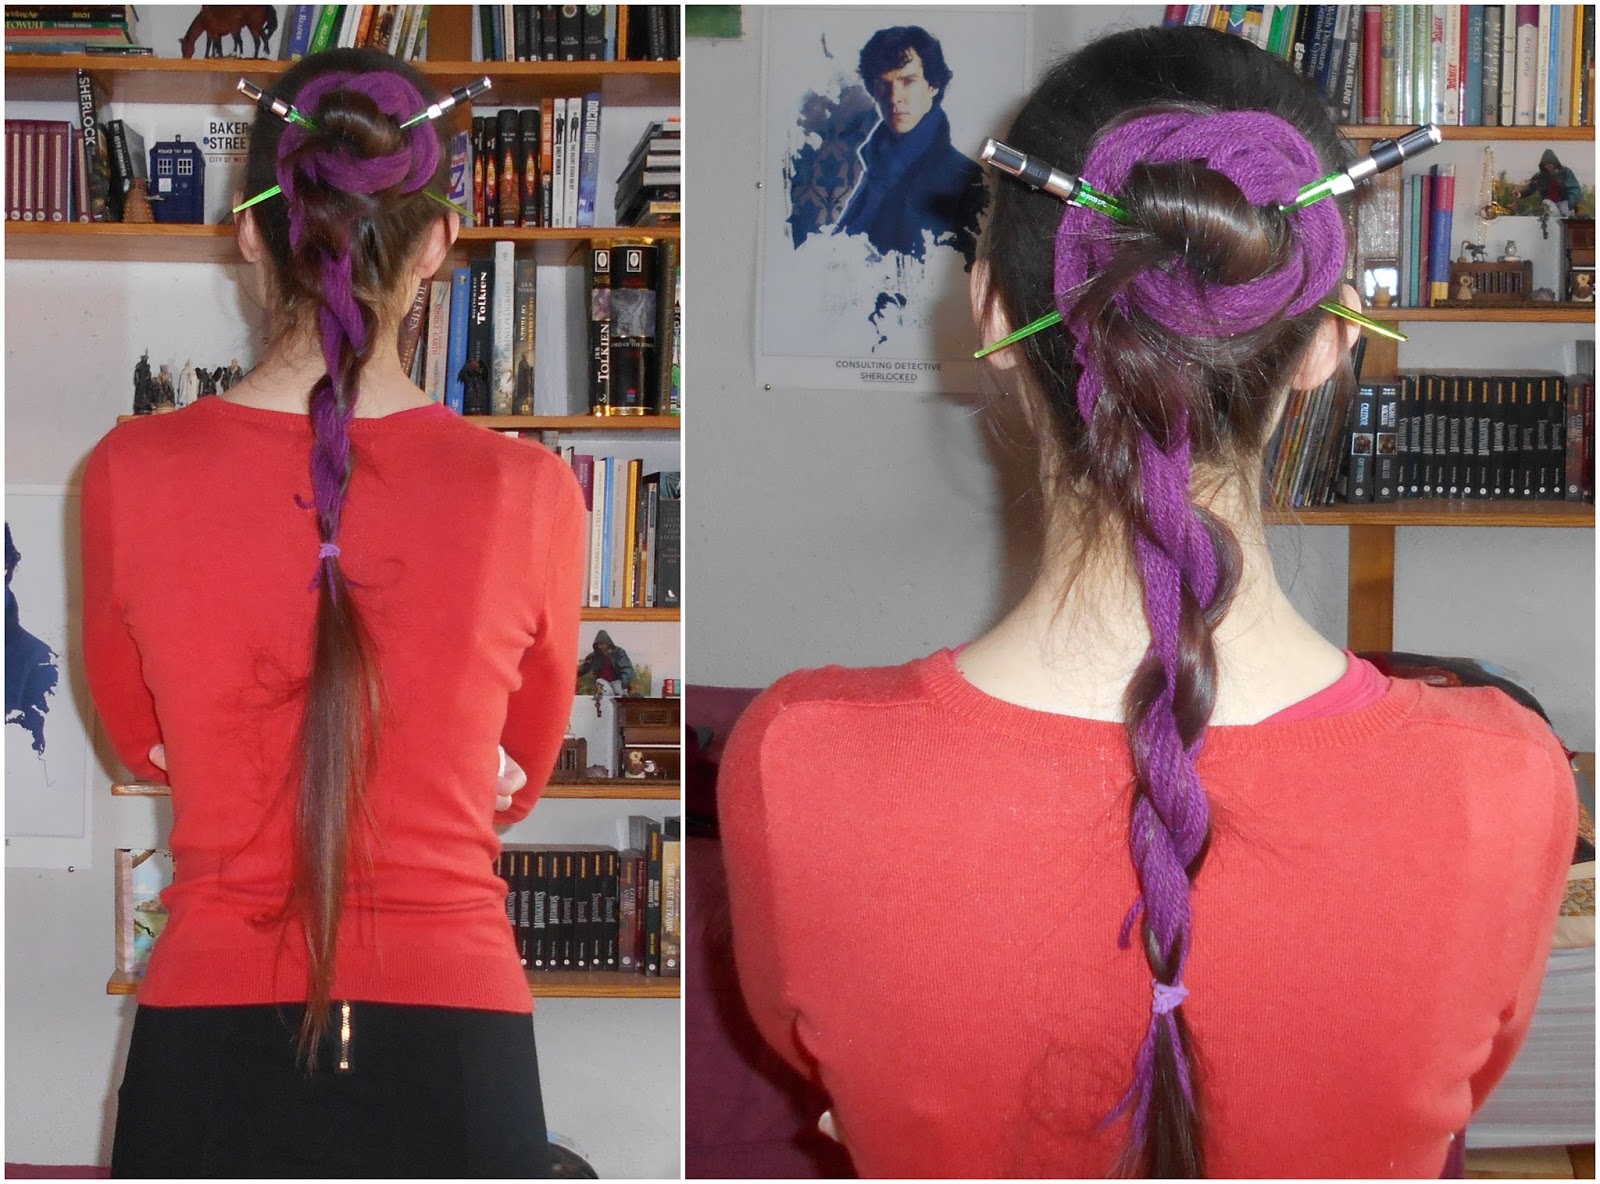
2. I don't have an specific title for this second style, it was improvised. Low coiled length-shortening bun?

The starting point is loose hair with a simple half-up (side strands of hair held at the back with a small elastic and/or a decorative clip). I then gathered the loose hair into a low ponytail (without tying it with an elastic), and coiled some of the length into a cinnamon bun, pinning it with some open pins. In my experience (I have very fine-textured slippery hair), this style wasn't very secure, and the bun fell in a short space of time. I'd need an elastic as base and more hold when securing the bun. Also, I generally don't favour low buns because they scrape my nape and I find them uncomfortable.


SwordWomanRiona / rionashairblog.blogspot.com.es

If you copy-and-paste this post and/or alter it without any permission, credit or link, you're stealing my content. In that case, please stop. Please ask before using my work, or at least share it properly, giving credit to me and my blog.

Monday 19 October 2015

Hairstyles - Elven inspired hair taping variation

Last week, during a Tolkien convention, I came up with a variation of the Elizabethan hair-taping for a Rivendell Elf cosplay, and I quite liked how it turned out:

The Elizabethan hair taping is a historical style "probably borrowed from the Italians, the style involves wrapping braids around the outside of the head (crown braid style) and sewing tapes or ribbons around and around to secure the braids to the scalp. This was a practical style, keeping hair neat and clean for several days; it could also be very decorative if the tapes were wrapped in attractive patterns." (https://suite.io/sarah-tennant/59c22x0)
  • For this style, I used:

-An elastic without metal for the initial ponytail.
-Two parandas (info about making parandas and braiding them into hair here). Parandas are optional, but a nice addition if you want added volume and colour.
-A gold thread (alternatives include ribbons and any kind of threads or strings to tie your braids with)
-Bobby pins (closed and open). The thread can be enough on its own, but I prefer the added security of bobby pins.
-A stick for the bun variation.
  • Steps (video tutorial planned!):
For the Elizabethan hair taping, I can recommend tutorials such as Torrinpaige's:
                                         
The steps I followed for my 'Elven' variation are the following:

1. Pull your hair into a high ponytail (or a low one, I went with a high one) and secure it with a hair-friendly elastic without metal.
2. Divide your hair into two parts. We're going to rope braid each section, adding a paranda.

The rope braid is, in my opinion, one of the simplest braids alongside the three-strand braid. Here is a tutorial. When you add a paranda, the method is similar (rope-braiding with a paranda in my video tutorial here): First of all, instead of three sections you want the paranda to have two, given that this braid only has two sections. I do this by dividing the middle strand of the paranda equally between the left and right one. Then you add one section to each section of hair and twist the two combined hair+paranda strands to form a rope braid in the usual fashion. Be extra careful not to let the paranda slide down when you start twisting!

The style so far looks like the pic on the left (the pic on the right being the final style):


3. Now I started hair taping my hair, following Torrinpaige's tutorial. I started pinning the braids around my head with closed bobby pins and then secured everything (and added adornment) with the golden thread. I added the gold thread after coiling and pinning my braids once around my head, instead of tying the thread and wrapping it around the elastic to hide it, like Torrinpaige and most 'hair-tapers' do. This is because of the variation I introduced:

4.  After coiling both braids once around my hair and securing them with the pins and the thread, I wrapped the remaining length around the ponytail base to form a bun, secured with a stick (instead of wrapping everything around my head). 


For this Elven cosplay, I was initially planning to do a hair taping version which left some of the hair loose, but ended up with this, and, while I think many of us tend not to imagine Elves wearing updos,  this kind of style could easily fit a Rivendell Elf, in my opinion:) Elven women like wearing tressures, snoods and hairnets, after all, and there are Elven-women, such as Galadriel, described wearing braided updos, so I've always imagined some Elven peoples, such as the Noldor, as wearing Italian Renaissance-inspired styles :)


SwordWomanRiona / rionashairblog.blogspot.com.es


If you copy-and-paste this post and/or alter it without any permission, credit or link, you're stealing my content. In that case, please stop. Please ask before using my work, or at least share it properly, giving credit to me and my blog.

Thursday 15 October 2015

Hair routine video: Post-shower detangling and drying

 In this video, my first hair video about haircare and my hair routine, I'll be showing how I finger-detangle and blow and air dry my post-shower knee-length hair.

This is my personal routine and obviously isn't what everyone "should" be doing with their hair, it's what works for my fine-textured, knee-length straight 1a/1b F ii/iii hair :)


SwordWomanRiona / rionashairblog.blogspot.com.es

If you copy-and-paste this post and/or alter it without any permission, credit or link, you're stealing my content. In that case, please stop. Please ask before using my work, or at least share it properly, giving credit to me and my blog.

Thursday 8 October 2015

Length shots at the Sherlock Holmes Pub

Knee-length again! :) Couple of length shots while taking pics at the Sherlock Holmes pub in London in casual Sherlock BBC cosplay :D


SwordWomanRiona / rionashairblog.blogspot.com.es

If you copy-and-paste this post and/or alter it without any permission, credit or link, you're stealing my content. In that case, please stop. Please ask before using my work, or at least share it properly, giving credit to me and my blog.